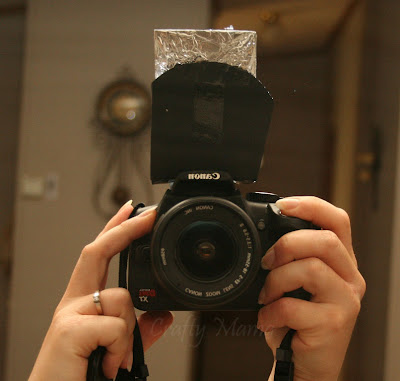
In a quest to better my photography skills, I came across a knifty little item on Elizabeth Halford's blog. It’s called a Light Scoop. After reading her posts about it, and seeing the before and after pictures, I knew I had to have one. I experimented with holding something reflective in front of my flash (a piece of cardboard covered in foil) but I couldn’t get it to stay in one spot while focusing on what I was photographing. So I google searched how to make a Light Scoop, and what do ya know, I found a tutorial! This is a great step by step tutorial on how to make a light scoop. To try it out, I just used cardstock (2 layers thick), some tape, and my handy dandy foil covered cardboard. I’m really hoping to make a more sturdy one at some point (you know, with a real mirror), but for now, this works. I can’t believe the difference it makes! Here’s some comparison pictures. My kitchen has HORRIBLE lighting, so I used it as an example. (P.s. I’ll get a tutorial up on how to cold brew coffee soon, it’s brewing right now!).
In my poorly lit kitchen, ISO jacked way up, no flash.
With flash.
With the lightscoop.
Can you believe the difference? It looks as though I just knocked down a wall and let some light into my kitchen! I can’t believe how natural it looks. I think every photographer needs one of these.
With the little bit that I’ve experimented with photography, my number one problem is lighting. My house just doesn’t have enough windows (or else it’s those gosh darned trees that surround all my windows!) and I always have horrible shadows and poor lighting. I can’t wait to see how much of a difference this will make with all the photos I take in the future. Here’s the tutorial I used, with a template for a Canon camera.
Here's some more comparison pictures!
My crazy messy crafting desk, taken at nighttime in low light.
Also taken in low light at nighttime.


fantastic idea! our home has the same issues with lighting. i've only got two spots that give off great natural light, and its rarely convenient to usher my subjects over to those spots. i'm going to try this! thanks!
ReplyDeleteThis is a great idea! I have a smaller P&S... wonder if I can make one for my camera. Will have to check out those tutorials. Thanks!
ReplyDeleteI've made one as well except I used a plastic mirror that came off my daughters jewelry box. So no fear of it breaking but it works great! I do however need to figure a way to attach it.
ReplyDeleteWow! That's great! Thanks for sharing!
ReplyDeleteI have been waiting for someone to figure out how to make these...thanks soo much for sharing ;)
ReplyDeleteThanks!! I can use all the help I can get!! ;)
ReplyDeleteThis comment has been removed by the author.
ReplyDeleteThank you so much for linking to my tutorial! I am in the process of moving things around, but the post will soon find a new home at http://www.wendymonster.com/diy-lightscoop-pattern/
ReplyDelete