Thursday, March 24, 2011

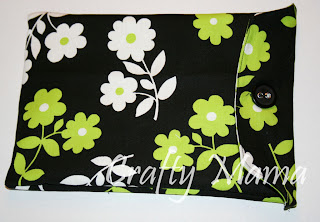
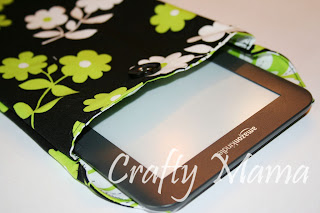
Kindle Case

First of all, I finally made myself a Facebook page for my blog! Go ahead and check it out, I'd love it if you "liked" my page! I'll be posting links to my blog whenever I update it. I'm also likely to post anything creative that I come across that I want to share. So get on over there!

Now, on to my most recent project!
I saw this great Kindle Case over at Sohl Design. I gota admit though, I didn't even look at her tutorial, I just winged it. But I saw it, and I had to make it! She gave me all the inspiration I needed!

Choose two coordinating fabrics.
From each fabric, cut out a long rectangular piece measuring 7 by 20 inches. You can leave your ends squared, round them off, or taper them. I chose to taper mine. 
Place your fabrics pattern side in, and sew around the edges. Leave one end open.
Flip it right side out. 
Fold the edges of your open side in, and sew a top stitch. Sew a top stitch along the other end also. This would be a good time to iron it.
Choose which side you want showing on the outside. I chose to have my black fabric on the outside. Fold it so your outer fabric is on the inside. Sew your side edges.
Turn your case right side out. 
Sew on a button and make a button hole. If you're like me, and too lazy to learn how to use the button hole setting on your machine, then just use a really tight zig zag stitch for your button hole. It worked pretty well for me.



Wednesday, March 23, 2011

Silhouette giveaway!

Decor Chick is giving away a Silhouette machine! Head on over there before it's too late and get your entries in!

Thursday, March 17, 2011

Tuesday, March 15, 2011

Mosaic Jello

I saw this recipe on Our Best Bites a while ago and have been looking for an occasion to make it. The opportunity finally came up! I love how you can customize the colors for any holiday (Christmas, Halloween, birthdays, football season, ect). My mom suggested I make it for Easter with pastel colors. I'm thinking about making it for Independence Day with red and blue jello. It was a little sweet, though, so I'm thinking about 1: using sugar free jello next time (although there's less color and flavor options) and 2: maybe substituting the sweetened condensed milk for something else (like coconut milk?).

What You'll Need:
4-5 boxes of Jell-O
2 pkgs Unflavored Gelatin (2 Tbps)
14 oz. can of Sweetened Condensed Milk

Before you start: leave yourself enough time to make this dish. The Jell-O takes 4+ hours to set, and it needs to set twice. I started the first step in the morning, and did step 2 later that night. The following day it was ready to cut into squares.

Step 1: 
Boil a pot of water on the stove. You'll need 4-5 cups (depending on how many packages of Jell-O you prepare), and a little extra to compensate for evaporation while it's boiling. I just boiled a large pot of water; it was easier to dip my measuring cup into it to get what I needed, rather than pouring it out of the pot.
Prepare your tupperware. Once the Jell-O is mixed, it will be roughly 1 1/3 cups of liquid, so you don't need anything too large. I used random sizes of tupperware that I had sitting around. Spray the tupperware lightly with pan spray. 
Once your water has come to a boil, measure out 1 cup. Mix in a packet of Jell-O and stir to dissolve. Once it has completely dissolved (I gave it a good 5 minutes, stirring randomly), pour it into one of your lightly sprayed tupperware containers. Repeat this step for all of your packages of Jell-O. 
Place in the fridge to set for at least 4 hours, preferably over night.

Step 2: 
Sprinkle your gelatin over 1/2 cup of cold water. 
Let it sit for 5 or more minutes to bloom.
While that's sitting, boil 1 1/2 cups of water. When the water comes to a boil, mix it with the bloomed gelatin. Let it dissolve, roughly 5 minutes.
Add in the sweetened condensed milk and stir to combine. Set aside to cool.
Take your set Jell-O from the fridge. Cut each color into cubes. 
Prepare a 9x13 pan by lightly spraying it with pan spray. Dump each color of Jell-O into the prepared pan. Mix the colors by lightly tossing with your hands.
Once the milk mixture has cooled, pour it on top of your cubed Jell-O. Let it set in the fridge for 4+ hours. 
Once it's set, cut into cubes and serve.

Friday, March 11, 2011

Buttercream Frosting


What You'll Need:
3 cups Powdered Sugar
1 cup Salted Butter (2 sticks)
1 tsp Vanilla Extract
Dash of Heavy Whipping Cream (or milk, or half and half)

Start by softening your butter. A tip I learned from school: to soften butter, put it in the microwave for 5 seconds, flip it, and repeat 2-3 times until it is the desired softness. If you don't flip it in between, it will all melt in the center, and you don't want melted butter!
Throw your butter in the mixer with a whisk attachment. You can also use a hand mixer for this if you have one. Set your mixer on low for 30 seconds or so, just to break up the butter. Slowly incorporate the powdered sugar, 1 cup at a time. Once the powdered sugar is incorporated, turn your mixer on a high setting and whip the mixture for about 3 minutes. It should now be light and fluffy.
Scrape down the sides and bottom of your bowl, and add the vanilla. Whip it for another minute. Taste test it for smoothness and flavor, and add a small dash of cream at this point. Whip it another minute and taste it again. 
This is the tastiest, simplest butter cream I've tried so far. It's light and fluffy and oh-so good. It's also great for decorating cakes (which is what I made it for!) I love passing along a good recipe when I find one because there's so many bad ones out there, it's hard to weed them out if you haven't tried them before.

Unfortunately, all I was able to do was taste test the frosting. We just discovered that Charlie has a milk protein allergy, and if I eat dairy, he screams. All day. Every day. It's amazing how much time can be used up holding a crying baby! I'm happy we figured out what was going on though, and he's much happier now. I'm only on day 5 of my dairy free diet, but he's already doing so much better. 
Charlie was a trooper while I made my frosting.
Snoozing in the Sleepy Wrap.
And Emma? She was good, too. And yes, she was rewarded for her good behavior, she got to lick the spoon! :)

Free Valspar Paint Sample!

Valspar is doing a promotion where they give out a free paint sample to the first 1000 people every day. I missed it on my first try, but got it on the second! I ordered mine on Saturday and got it on Thursday, and they don't even charge shipping! And the sample is a cute little tub of paint, which comes with a mini roller and 2 plastic paint pans. So stinkin' cute! So head on over there to get your free sample! The store re-opens at 9 am every day, so don't be late!
Check out how cute that mini roller is!
I got a color called "Rushing Stream". They send along a few examples of complementary colors to go with it.

Wednesday, March 9, 2011

My newest love affair.

My Kindle! Ben got it for me for my birthday (a little early, but I don't mind). I spend so much time nursing my little one, so this is a great gift! I just love it. It's the perfect gift for a book worm like me! I wasn't getting in much reading time (can you say "toddler who keeps stealing my bookmark and losing my page"), but with this I find it so much easier! I can hold it with one hand while nursing, AND turn the page without any difficulty. It holds books I've downloaded from Amazon, and pdfs that I've downloaded with different programs and websites I've found. There's also lots of websites out there where you can download free e-books (totally legal, and some illegal, heh), and blogs that direct you towards free e-books posted on Amazon. So far I haven't had to buy a single book, but I've got over 80 in my library. She still doesn't have a name, any suggestions?

Sunday, March 6, 2011

Best. Breadsticks. Ever.

I tried out this recipe for bread sticks on the Food Network website a few weeks ago, they are to DIE for! I never knew homemade could be so good. :)

What You'll Need:
Dough:
1 package yeast (or 2 1/4 tsp of yeast)
1 1/2 cups plus 2 tbsp of water (divided)
4 1/4 cups flour (I used bread flour)
2 tbsp butter (or olive oil)
2 tbsp sugar
1 tbsp salt (you can skip this if you used salted butter)

Topping:
4 tbsp butter (give or take)
Salt and garlic powder to taste
Pinch of oregano (I just did fresh chopped parsley, just for color)
Grated Parmesan cheese

Add 1/4 cup of water and 2 1/2 tsp of yeast to your mixing bowl. Let it sit for about 5 minutes to dissolve.
To that, add the remaining 1 1/4 cups plus 2 tbsp of water, flour, butter, sugar, and salt.
With your dough hook, mix until it creates a dough, about 3 minutes. Place your dough on a floured surface and knead it by hand for another 3-5 minutes.
Using a knife or plastic board scraper, divide your dough into equal parts. If you're only making bread sticks, divide it into 16 equal parts. I'm making pizza and bread sticks, so I divided it in half, and then divided the one half into 8 pieces.

Melt about 2 tbsp butter.
Roll your bread sticks out into approximately 7 inch long sticks.
Brush your bread sticks with the melted butter. I added this step because I noticed that this dough tends to get a crust on it pretty fast. The butter keeps that from happening. It also creates a nice golden crisp crust on the bottom of the bread sticks once they're baked.
Place your bread sticks in a warm spot. I like to preheat my oven to 200 degrees and then turn it off. Once the temp comes down to about 90-100 degrees, I put the dough in to rise, this seems to speed the process.
Once the dough has risen to about double, take it out of the oven and preheat the oven to 400 degrees. Bake for about 15 minutes, or until golden brown on top.
While the bread sticks are baking, make your butter topping. Melt the butter, and add to it the chopped herbs, salt, and garlic powder.
Once they're done baking, brush on the butter mix, and sprinkle with parm cheese.